Friday 20 April 2012

St Mary's University Theatre - Back wall repaint

After 'They Shoot Horses, Don't They?' had been struck from the theatre, once the posters were removed, the double sided tape that was used left marks all across the back wall.


The extension with posters
I was approached by Alistair Milne, Senior Theatre Technician at St Mary's to return the extension section to it's former state. 


With help from my good friend Greg Smith, we spent a morning sanding off the tape, then simply repainting the whole wall.


Sanded down


The double sided tape


Final product - fully painted


Monday 16 April 2012

Odds and Ends: Guitars - Telecaster

Following on from the previous post of the complete re-wiring and modelling process of the Eddie Van Halen style Stratocaster guitar, this post deals with another guitar project. The aim of the project was to change the colour from red  to black and white striped. 


The original factory paint job with an EVH style design
Replica of the original design. The same template was
used, albeit adapted for a Telecaster and the colour
scheme inverted.


Considering the experience with repainting guitars from the Stratocaster project, the job in question was far easier and quicker due to my new found knowledge and process of the actual job itself. 


To begin with, I removed the crude tape design from the body of the guitar. Next, the guitar was dismantled completely so I could effectively access every nook and cranny on the body of the guitar. 

Semi-painted


The body was then completely sanded down by hand to remove the gloss finish from the red factory paint job. I decided that, to simplify the process, I would stick with a black body with white stripes. This also proved a lot quicker, as it only required one coat. After the black had fully covered the previous coat of red, the body was then lacquered to finish.


Painted and lacquered 

While the body was left to dry, I photographed the body and planned using PhotoShop where the stripes would go.

The PhotoShop design template for the stripes. The thinner red lines represent the first layer of tape,
the thicker red lines representing the second.


Once the body was completely dry, I followed my PhotoShopped plan of where to lay the stripes using white electrical tape.


Finally, the guitar was reassembled and rewired.


Fully functional, the project was successful and I am happy with the outcome (above right image). The experience on the previous guitar project proved invaluable, as the whole process was swift and had no hiccups


Tuesday 27 March 2012

Odds and Ends: Guitars - Stratocaster

A great hobby of mine is guitars, both building and playing them. I don't claim to be the best at either task, but it's something I enjoy greatly nonetheless.


Stratocaster
Some time ago, I began work on a guitar styled after Edward Van Halen's own design for guitars. I began with two guitars, a Peavey Vortex and a 3rd party Stratocaster model. 


Edward Van Halen with his homemade 'Frankenstrat' circa 2007.
Essentially, the whole project was to transplant the Vortex's guts into the Stratocaster. The process began with dismantling each guitar, and removing all the 'guts'- wiring, bridges, pickups, necks, jacks, etc. Because the Stratocaster's body wasn't built for the Floyd Rose style bridge the Vortex has, the housing around the bridge had to be delicately chipped out to accommodate the larger bridge.


 Once both guitars were gutted, the Stratocaster body (left picture, right guitar) had the glossy coat removed via sanding. Once the coat had been taken off completely, the excess dust was wiped off and the body primed with white primer.


After the white primer coat was dry, tape was spread across the body to mask the white sections from the  red coat of spray paint that was to follow. Once the red coat was finished, the same technique was used again to add the final layer of black paint.


After the aesthetics of the guitar were finished, I moved on to replacing the guts of the instrument. This involved cutting the pick guard out to accommodate larger pickups (see above left image) and rewiring the guitar as a whole. Being a novice with soldering in general, this proved challenging, but not impossible. After several attempts at soldering, I finally managed to get the wiring right. 


The above right image shows the initial final product of the project. Overall, I was relatively happy with it. Although, after all the hard work I put into the project, it still didn't sound and feel quite right.


After six months or so of the project gathering dust, I returned to it and had another go. I re-dismantled the guitar again and tweaked the design. I added more black stripes to it than I originally did, added damage to the guitar such as heavily scuffed edges and cigarette burns as well as replacing the original bridge. Even after the second attempt at the building, it still wasn't quite right. 


Once more, I revisited the project recently and de constructed the guitar again, this time intent on getting the wiring right once and for all. With this in mind, and realising that what I had just wasn't working enough, I completely started again with the wiring. So as to simplify things, I simply wired  one pickup to once control nob and the amp jack. And it works! Well, almost anyway. There are still some wiring issues (as I said, I'm not the best in the world!) but (I think) it's a case of the grounding of the electricity.


Even now, after all the time I've spent on making this guitar, I will admit, It still doesn't work; with the wiring issues, tuning, problems and a problem with the bridge, there is still ways to go before I get the right. I'll get there in the end. Because I've been working on this on and off for so long, I don't think I even could just throw it all out and be done with it. I've enjoyed the whole process thus far, and it has enlightened me that, yes, I am capable of doing things such a this, but I've still got a ways to go to get things perfect, and that no matter how hard something is to do, keep at it.

And you have my word that one day, I will get this blasted thing right!


Sunday 25 March 2012

Love's Labour's Lost

Earlier in the year, I was asked if I would like like to be set designer for a production of Love's Labour's Lost at St Mary's University College that would be taking place in mid to late April 2012.

Unfortunately, due to many conflicts with other commitments and scheduling issues between the majority of the cast and crew, the show has had to be postponed until September 2012.

Much of the work I had commenced was still in the design phases, but ready to go to be built by myself and Abi Toghill, who had volunteered to help me out.

The concept of the play was to have it set in 1980's Oxford University, with the story unfolding through the students. The play would be set outside on the priest's lawn. With this in mind, I began sketching general ideas for an outside set after conducted some research.


Scan of the initial design

A more refined idea, closer to what the set should look like


From the start of the design, I wanted the set to be completely static, but fully functional (eg; if there was to be a door, it would work). The grander idea (see top left image) would have ideally be built as a 3-piece set onto flats that bolted together when needed, then weighted at the back with stage weights for stability.Although I would have greatly enjoyed all the attention to detail this design required, I knew it could not realistically done considering time and budget constraints.


The next idea I worked on is the pillar (see top right image). This idea came from researching a particular campus in Oxford University; Corpus Christi (see below image).


Oxford University's Corpus Christi Campus' Quad.
The design was focused on the pillar.

Seeing as the set would be static, the pillar idea would work extremely well outside. Paths would be laid down in each compass direction from the pillar in gravel or sand, and benches would be added on two sides.

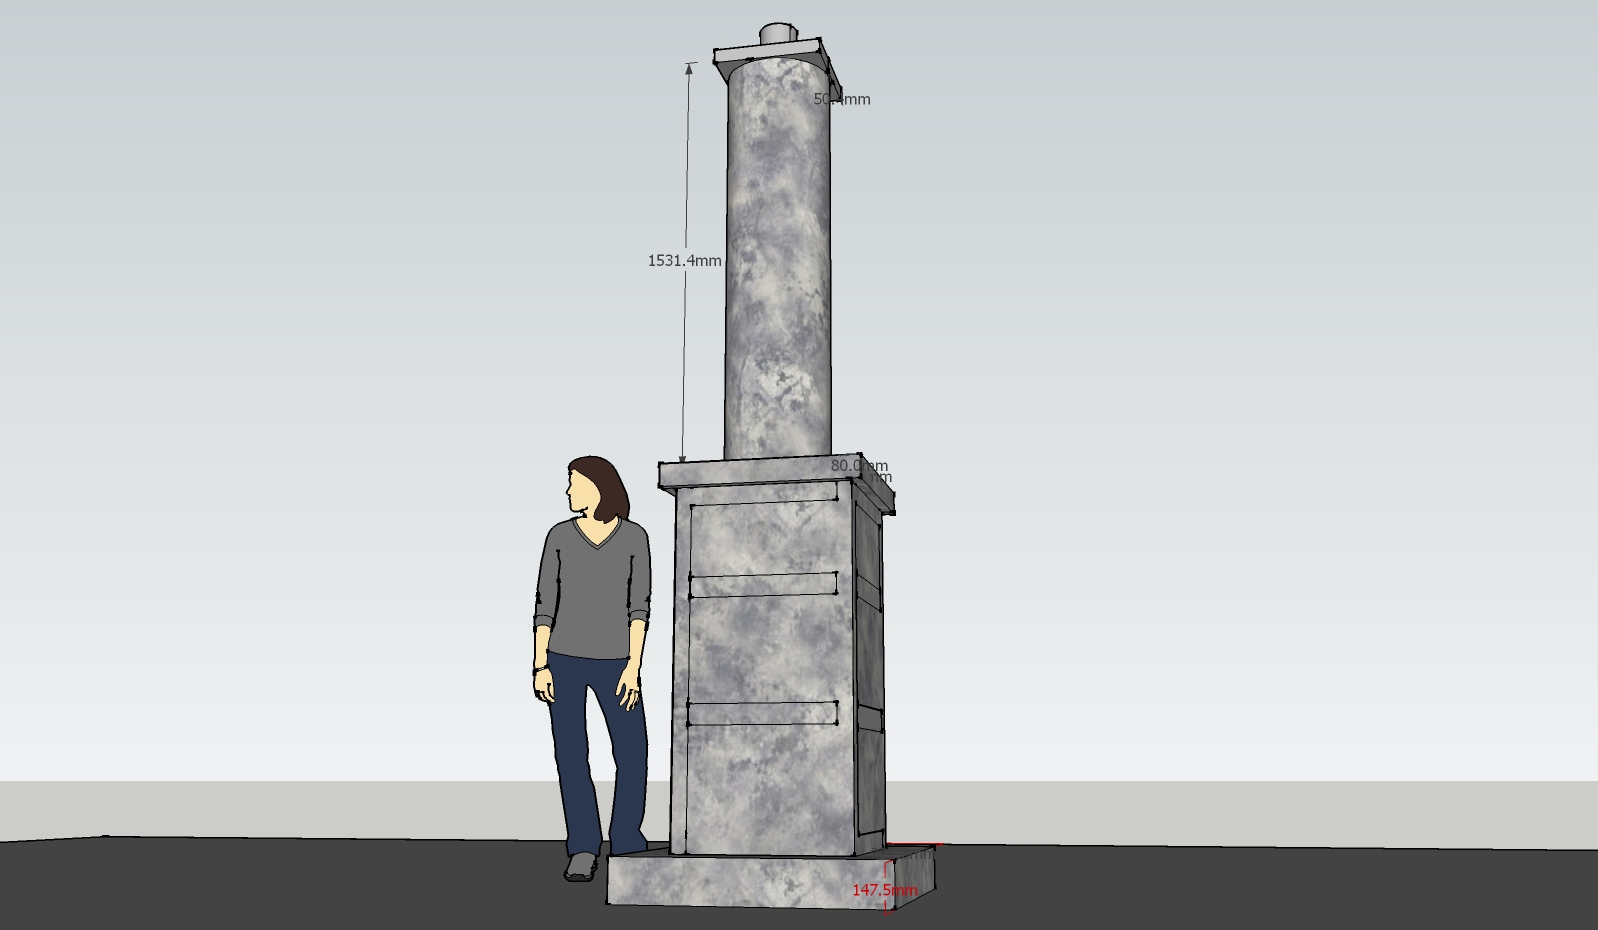
3D drawing of the set 


Scale version of the set


Cross-section showing how the set should be built

The pillar will be around 12ft high and built in sections for ease of transport, with the bottom oblong section, the pillar section and base section being separable.


Thursday 22 March 2012

Carvalho Studio


21/3/12

Today I worked at Carvalho Studio. Based in Hoxton in East London, Carvaldo Studio is a small studio dedicated to bringing the best sets and ideas for theatre into life through precise and beautiful scale models.


The workspace
Luis Carvallho invited me to visit the studio for a day to see the work  that goes into set model making. We spent time going over the process of the making, and chatted away about our own backgrounds in theatre and design. Currently, Luis working on developing a model box for a production of Eugene Onegine taking place in Canada later this year.


Luis' model thus far for Eugene Onegine
I was able to help Luis along with some of the work; I was asked to complete a digital scale version of some rolling flats that will have tree silhouettes spread across them. The design was made from a photograph of a wood. Once the design is fully finished, it will be sent to be laser-cut for the best precision in the model. It roughly measured  34 x 77 cm


The forest silhouette design

It was a pleasure to work at Carvalho Studio for a day, and will hopefully work there again in the near future.


Tuesday 13 March 2012

They Shoot Horses, Don't They? (4)

 7/3/12

With the show starting today, everything has been completed. Since the last post, the posters have all been put up around the theatre; across the back section and across the adjoining pillar. The bed section has had flats put up inside it to mask the walls, which has since been painted black and dressed appropriately with a noticeboard full of photos and sign-up sheets from the age. The hours elapsed board has had the font amended and extra panels made for the ease of the cast. Also, it has been painted to give it a wooded effect. With the 6ft section up and ready, it has been masked with sheets of board and then had posters scattered across the masking. For Rocky’s office, a flat was reconditioned to be able to accommodate a door. When the door was found, it was a flat black; it has since been cut and now has a window made from a frosted gel. A new addition to the design was a banner that hangs above the postered section which reads ‘Marathon Dance Contest 1936’.

The show run from Wednesday 7th March through to Friday the 9th at 7.30pm each day, with a matinee on the 7th at 4.30pm.

All in all, this production was an absolute delight to work on. It had a great production team and a great work ethic behind everyone involved.; it’s been a pleasure working alongside TA2 and the technicians.


Saturday 25 February 2012

They Shoot Horses, Don't They? (3)


22/2/12
Scaffolding for the set was cut today (6 x 6ft scaffold poles), but we are still currently waiting for the supplier to deliver the rest (another 6 poles). Also, work began today on the ‘Hours danced’ board. Using old materials found in the workshop, a 60 x 140cm board was cut out. To provide the numbers for the board, sheets of board with the same dimensions as an A3 sheet of paper (29.7 x 42cm) were cut, with 13 in total.


24/2/12
Progress on the ‘hours danced’ board continued today; the sheets have been painted white with the numbers in black. The scaffold for the 6ft section also arrived today after much delay from the supplier. The posters have all been printed and are now ready to all be placed on the conservatory section.